To create FTP accounts, first click on the "FTP Menu" icon in the main control panel screen. You will see a list of current FTP accounts that looks something like this:

Default FTP Account
The default FTP account and control panel account have the same login name and password. You cannot delete the default FTP account but you can make its password different from your control panel password.
Important:
If you change your control panel password, the default FTP account password will still have the old control panel password. You must update the default FTP account in the FTP menu if you want both passwords to match.
Creating a New Account
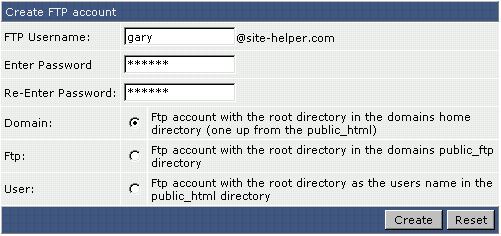
Click the "Create FTP account" link. You will see a screen that looks like:

First,
select a FTP username. In the above example, we chose
"gary." Next, enter a password. Then,
select the access level of the FTP account.
Domain: This FTP user has access to public_html,
private_html, mail, domains, and backup directories.
FTP: This FTP user has access to the public_ftp directory only.
User: This FTP user has access to public_html/username/ only. If we selected this option in the above picture, the
FTP user would only have access to public_html/gary/ or http://www.site-helper.com/gary/. (If there is a
subdomain named gary.site-helper.com, this FTP user would also have access to it.
If the directory doesn't already exist, it will be created at this stage.
Finally, click the "Create" button.
After Your Click "Create"
After you click "Create," the control panel will show you the login information for the FTP account you just created. You may notice that your FTP username has @yourdomain.com after it. This is because your domain is using a shared IP address. If your web site has its own dedicated (static) IP address, your FTP username will not have @yourdomain.com after it.
If you have a dedicated IP address and you create additional domains on that account, these additional domains will have FTP logins of username@thatdomain.com.
Logging into an FTP Account
Step 1: Obtain FTP client software.
Uploading to the server through FTP requires special software. Most computer systems do not come with FTP clients, so you will have to download one from the Internet. We suggest:
IBM/Windows:
LeechFTP
(free), WS_FTP
LE (free), FTP
Explorer (free),
CuteFTP
(free trial).
Macintosh: Fetch
(free), Transmit
(free trial).
Step 2: Connect to the server.
All FTP clients need the following information:
Username
Password
Address - This is the address of the server. Use ftp.yourdomain.com
Port - Use the default port (21).
Some clients may ask for the host type (select "auto"), ASCII/Binary/Auto (select "auto), and the initial remote folder (you may leave this blank or change it to /domains/yourdomain.com/public_html to start off in the main web directory).
Step 3: Change to the desired directory and upload your files.
To upload, highlight the files/folders on your computer and drag them into the appropriate directory on the remote server. Each FTP client operates differently, so please consult its help file for complete instructions.

